Showing posts with label HOW-TO. Show all posts

Blogger's New Interface

Blogger's user interface has a new look!

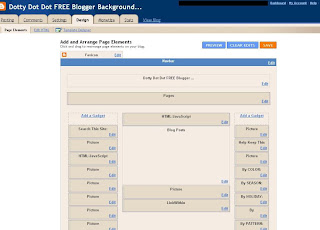
OLD BLOGGER DASHBOARD (pre-2011):
NEW BLOGGER DASHBOARD:


It's so sleek and cool. There are no tabs across the top, instead they've been moved to the left sidebar. It's easier to navigate and find stuff. I'm liking it, for sure. There are a few slight changes to installation instructions for my backgrounds using the new Dashboard & Interface. In my "How To Install" instructions I will have step-by-steps for both the new and the old Interfaces. Here's the new one! ...

How to install a Dotty Dot Dot Background using Blogger's NEW Dashboard and Interface:

    1. Choose a background.
    2. Copy all of the Background's code.
    3. Go to Layout. (on your left nav bar)
    4. Click "Add a Gadget".
    5. Choose to add an "HTML/Javascript" gadget.
    6. Paste your Dotty Dot Dot background code in that dialogue box.
    7. After you save it, you may move that box wherever you like in your Layout tab - and it should be easy to remove by clicking "edit" on the gadget box containing the code.
    8. Go to to Template (on your left nav bar)
    9. Scroll down to Picture Window
    10. Choose the blue square
    11. Ta-Da! You have a new background!
    *While on the "Template" page click "Customize" to change font colors, blog width, etcetera...
    *The background may not show up in the preview on your Interface, but IT IS THERE! See the Preview or go to your actual blog URL to make sure.

Blogger's Fun Fonts

Blogger has added more fun fonts to the Template Designer.

Go to:
  • Design Tab
  • Template Designer
  • Advanced
  • Scroll through the Fonts

And if there still aren't enough fonts for you, add more!

How To Change Your Post Titles to a Cute Font

With a toddler and an infant I don't have time to fiddle with this, but Kevin&Amanda have the answer, here!

*New* Stylized Headers

Have you noticed the new Headers I've been uploading? I'm calling them Stylized Headers (they look transparent, or "see-through" and are usually .png format.). I'll still be doing some old Rectangle Headers (.jpg), as well.

AnnaKatherine asks:
How do you "erase the text" on the (stylized) header?
I'll add on to that question, How do you personalize any header?
Find the answer here.


*If you want a Header personalized, I will do it for $5. Email me; ashblog (at) hotmail (dot) com.*

How to Add a Signature Automatically to Every Blog Post

Automatic Blog Signature:

FIRST, Make an image that will be your signature. A good size for this is 160x80pixels.

SECOND, Upload it to an image hosting site, such as Photobucket or Flickr (just two of the many sites out there).

THIRD, After uploading it, copy the HTML Code.

FOURTH, Get it to publish automatically on every blog post:

  • In Blogger, click Settings tab
  • Click Formatting
  • Scroll down the page, to the Post Template box.
  • Paste your Signature’s HTML Code into the text area next to the words Post Template
  • Click SAVE button
  • TRY IT! Go to make a new post – there you should see your Signature in the editing post box!


*This
tutorial taught me an the easy way to automatically add a signature to each blog post.

How to Add Snow to Your Background

In your customize "behind the scenes" area (the Design tab):


  1. Add A Gadget
  2. Select Add HTML/JavaScript

  3. Paste this code:


Thanks Rainy Day Designs!

Take Me With You

I made some take along buttons to put on your blog! They don't blink. Enjoy!

SMALL (1x1 in):


BIG (2x2 in)


How to Get and Add a New Font

My Mac-user sister was using (*gasp*) a PC when she called asking me how to add a font in a Windows based program. Knowing that she's very visual (she's a photographer), I made up this tutorial for her:

(click on it to make it big and readable)


*If for some reason the picture is not pulling up big enough to read, here are the written directions:
  1. Download a font (.ttf is a True Type Font)
  2. Go to "My Computer"
  3. Go to "Change A Setting"
  4. Find the "Fonts" Folder
  5. Drag and Drop your new Font into the "Fonts" Folder!


And here's where to get some new fonts!

Kevin & Amanda: Free Fonts!
1001 Free Fonts (I've been getting fonts from them for YEARS.)
DaFont
Abstract Fonts
Urban Fonts
Font Garden
Font Garden's HUGE List of Font Sites

And make fonts out of your own handwriting:
FontCreator from High Logic ($)
YourFonts ($)
Fontifier ($)
InteractImage (kind of lame)

How to Get Rid of the Header Border in Blogger

Want to get rid of those lines around the header at the top of your page? You have to get into the HTML of your Blogger Minima Template. This tutorial taught me how.

*When you're editing your "Fonts & Colors" it may still ask you for a border color. This is not for the border around header at the top of the page - it is for the dotted lines that divide your posts and sidebar widgets. Deleting those lines is another process.

Sponsor Dotty Dot Dot

1) Sponsored Ad Space
A visual ad that can link to your site.

2) Sponsored Reviews and Giveaways
Give away stuff!

Please contact ashblog (at) hotmail (dot) com

Fitting the Header

Headers are different sizes for 2-Column and 3-Column layouts
  • 2-Column Headers are 660px wide
  • 3-Column Headers are 940px wide

Adjusting a Header Using the Template Designer
After you have installed your Background and uploaded your Header go to:
Template > Customize > Adjust Widths > Entire Blog Width
Play with the width until it looks right.  (It will be about 660px for a 2-Column and about 940px for 3-Column)


My "Stylized Header" is not cut-out like it's supposed to be
DON'T click "shrink to fit" when uploading a "stylized header" (they are .PNG).  The rectangle headers (.JPG) may be shrunk to fit just fine.


Read about using different sized BACKGROUNDS on different sized layouts, here.

How to Personlize a Header

You may want to edit something onto the Header before uploading it on to your blog.

Use any photo editing programs such as Photoshop, Adobe Photoshop Elements, Paint, Corel Paint, PhotoSuite, Google Picasa, FotoFinish Suite, Photo Explosion, Photo Studio... Here are some consumer review sites for photo editing software (as of 5/2009): Consumer Search, Top 10 Reviews. It's easy enough to do a Google search for "photo editing software".


You'll find two Header styles on this site;
  1. Rectangle Headers (Usually .jpg format.)
  2. Stylized Headers (They look transparent, or "see-through" and are usually .png format.)

Personalizing a Header, step-by-step:
  1. In the blog post, click on the picture of the Header to open it bigger in a new window
  2. Right click on the picture
  3. Save it
  4. Open a photo editing program
  5. Erase my text [by using the Eraser tool in the program you are using. I know Photoshop has an eraser tool. Also - Paint doesn't like .png's, just so ya know.]
  6. Add your own text
  7. Save the Header (save it as the same format as it came [the formats for Headers you'll find on this site are either .jpg or .png])
  8. Upload the new edited Header to your Blog


*If you want a Header personalized, I will do it for $5. Email me; ashblog (at) hotmail (dot) com. [see examples below]---->


Here are some more examples of personalized headers.

Fitting the Background on the Layout

I Am Using Blogger's Template Designer

To adjust your blog's width to make it skinnier or wider;
Template > Customize > Adjust Widths > Entire Blog Width
Play with the width until it looks right.  (It will be about 660px for a 2-Column and about 940px for 3-Column)

I Am Using an Older Version of Blogger and I have a 2-Column Layout...
Any 2-Column or 3-Column layout found on Dotty Dot Dot FREE Blogger Backgrounds will fit.. 2-Column Backgrounds will have a tighter fit on a 2-Column layout. 3-Column Backgrounds are extra wide, but they still look good on a 2-Column layout.

I Am Using an Older Version of Blogger and I have a 3-Column Layout...
Any of the wider 3-Column Backgrounds should fit. BUT 2-Column backgrounds are too small for the wider 3-Column layouts. *If you don't have a 3-Column layout, but you want one, use these instructions.


Read about using different sized HEADERS on different sized layouts, here.

How to Install a Dotty Dot Dot Background / Header

HOW TO INSTALL A BACKGROUND:

NEW BLOGGER DASHBOARD & INTERFACE:

  1. Choose a background.
  2. Copy all of the Background's code.
  3. Go to Layout. (on your left nav bar)
  4. Click "Add a Gadget".
  5. Choose to add an "HTML/Javascript" gadget.
  6. Paste your Dotty Dot Dot background code in that dialogue box.
  7. After you save it, you may move that box wherever you like in your Layout tab - and it should be easy to remove by clicking "edit" on the gadget box containing the code.
  8. Go to to Template (on your left nav bar)
  9. Scroll down to Picture Window
  10. Choose the blue square
  11. Ta-Da! You have a new background!
*While on the "Template" page click "Customize" to change font colors, blog width, etcetera...
*The background may not show up in the preview on your Interface, but IT IS THERE! See the Preview or go to your actual blog URL to make sure.


OLD BLOGGER INTERFACE (pre 2011):

  1. Choose a background.
  2. Copy all of the Background's code.
  3. Go to your "Design" TAB. (not the "Template Designer"- if you're in the TD, hit the "back to Blogger" button (in the top right corner) and you'll return to your Blogger Dashboard "Add and Arrange Page Elements" area on the "Design" tab which is where you can add your cute and fun FREE background from this site (and add headers and other gadgets)
  4. Click "Page Elements".
  5. Click "Add a Gadget".
  6. Choose to add an "HTML/Javascript" gadget.
  7. Paste your Dotty Dot Dot background code in that dialogue box.
  8. After you save it, you may move that box wherever you like in your Layout tab (even to the bottom) - and it should be easy to remove by clicking "edit" on the gadget box containing the code.
  9. Ta-Da! You have a new background!

NOTES:

  • If the pictures appear fuzzy on this site, it's because I compressed them in these blog posts. It will not be fuzzy when you add it to your site.
  • WITH THE NEW BLOGGER TEMPLATES [using Blogger's Template Designer]: "Picture Window" (blue square) or "Awesome Inc" or "Travel" . (the background code DOES NOT go in your HTML template code - it is installed as a Gadget)
  • WITH THE RETIRED BLOGGER TEMPLATES (launched 2006): You can still find "Minima White" if you go to your "Design" TAB > "Edit HTML" > scroll down to "Old Templates" > "Select Layout Template" > "Minima White".


----------------------------------------------------------------------------------------------- 


HOW TO INSTALL A HEADER: Some of the backgrounds have matching Headers (if they do, you'll see them right there in the same post body). Here's how to use them:

  1. Click on the Header to get it Full-Sized in a new window.
  2. Right Click on the Picture.
  3. Save it to Your Computer.
  4. Use a picture editing program (like Photoshop) to add your personal touch.
  5. In Layout, click "Edit" in the "Configure Header" Box. (At the top..under the Navbar, above all the other boxes).
  6. Unclick "shrink to fit" when uploading a "stylized header" (they are .PNG). The rectangle headers (.JPG) may be shrunk to fit just fine, if needed.
  7. Upload the Header!

The headers are different sizes for 2-Column and 3-Column layouts

  • 2-Column Headers are 660px wide
  • 3-Column Headers are 940px wide

*Read this if your Header doesn't quite fit right.
*This is how to personalize your own Header.
**If you want a Header personalized by me, I will do it for $5. Email me; ashblog (at) hotmail (dot) com.

How To Enter a Contest:

To enter a contest on this site, follow the instructions on the contest post. Most require you to do something, like, follow this blog or use a background - and then you need to post on the contest post what you have done to earn your entries (i.e. "I have your one of your backgrounds up, I've been a follower from the beginning, and I put your button on my site - Give me 3 entries! ~ Suzy Q.")

--------------------------------------

You don't have to be a Blogger user to enter my giveaways for FREE stuff. Anonymous comments are allowed - but at least leave your name! This is an example of how to earn at least one entry:
  1. Post about the contest in your Facebook Status [or Twitter, or any site]. (Something like, "Win free stuff here! http://dottydotdotdesign1.blogspot.com")
  2. Find the giveaway you wish to enter.
  3. Scroll down to the "post a comment" box on the giveaway's post.
  4. Leave a comment like "Give me an entry for posting your contest on my FB status! - John V."
  5. After typing your comment, choose to comment as "anonymous" (at the bottom of the comment box). But be sure to leave your name or alias.
  6. Post the comment.

How to Make a 3-Column Layout - AND- Adjusting The Margins of Your 3-Column Layout

To make a 3-Column layout, I used these two articles from Three Column Blogger:

You need to do both of them:
1) Three Coulmn Minima Layout Version
2) Adjusting Three Column Margins
*(1-2012) This information is pre-Template Designer .


To adjust the width of the layout using the Template Designer:

After you have installed your Background and uploaded your Header go to:
Template > Customize > Adjust Widths > Entire Blog Width
Play with the width until it looks right.  (It will be about 660px for a 2-Column and about 940px for 3-Column)
Related Posts Plugin for WordPress, Blogger...