NEW BLOGGER DASHBOARD & INTERFACE:

- Choose a background.
- Copy all of the Background's code.
- Go to Layout. (on your left nav bar)
- Click "Add a Gadget".
- Choose to add an "HTML/Javascript" gadget.
- Paste your Dotty Dot Dot background code in that dialogue box.
- After you save it, you may move that box wherever you like in your Layout tab - and it should be easy to remove by clicking "edit" on the gadget box containing the code.
- Go to to Template (on your left nav bar)
- Scroll down to Picture Window
- Choose the blue square
- Ta-Da! You have a new background!
*While on the "Template" page click "Customize" to change font colors, blog width, etcetera...
*The background may not show up in the preview on your Interface, but IT IS THERE! See the Preview or go to your actual blog URL to make sure.
OLD BLOGGER INTERFACE (pre 2011):
- Choose a background.
- Copy all of the Background's code.
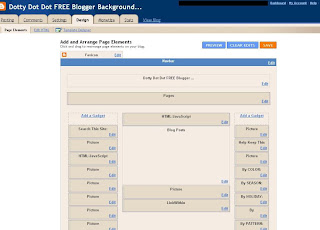
- Go to your "Design" TAB. (not the "Template Designer"- if you're in the TD, hit the "back to Blogger" button (in the top right corner) and you'll return to your Blogger Dashboard "Add and Arrange Page Elements" area on the "Design" tab which is where you can add your cute and fun FREE background from this site (and add headers and other gadgets)
- Click "Page Elements".
- Click "Add a Gadget".
- Choose to add an "HTML/Javascript" gadget.
- Paste your Dotty Dot Dot background code in that dialogue box.
- After you save it, you may move that box wherever you like in your Layout tab (even to the bottom) - and it should be easy to remove by clicking "edit" on the gadget box containing the code.
- Ta-Da! You have a new background!
NOTES:
- If the pictures appear fuzzy on this site, it's because I compressed them in these blog posts. It will not be fuzzy when you add it to your site.
- WITH THE NEW BLOGGER TEMPLATES [using Blogger's Template Designer]: "Picture Window" (blue square) or "Awesome Inc" or "Travel" . (the background code DOES NOT go in your HTML template code - it is installed as a Gadget)
- WITH THE RETIRED BLOGGER TEMPLATES (launched 2006): You can still find "Minima White" if you go to your "Design" TAB > "Edit HTML" > scroll down to "Old Templates" > "Select Layout Template" > "Minima White".
-----------------------------------------------------------------------------------------------
HOW TO INSTALL A HEADER: Some of the backgrounds have matching Headers (if they do, you'll see them right there in the same post body). Here's how to use them:
- Click on the Header to get it Full-Sized in a new window.
- Right Click on the Picture.
- Save it to Your Computer.
- Use a picture editing program (like Photoshop) to add your personal touch.
- In Layout, click "Edit" in the "Configure Header" Box. (At the top..under the Navbar, above all the other boxes).
- Unclick "shrink to fit" when uploading a "stylized header" (they are .PNG). The rectangle headers (.JPG) may be shrunk to fit just fine, if needed.
- Upload the Header!
The headers are different sizes for 2-Column and 3-Column layouts
- 2-Column Headers are 660px wide
- 3-Column Headers are 940px wide
*Read this if your Header doesn't quite fit right.
*This is how to personalize your own Header.
**If you want a Header personalized by me, I will do it for $5. Email me; ashblog (at) hotmail (dot) com.


